Tags
By default, all containers run hidden in a private network on the host. The containers are not accessible from the local network, nor from the Internet. However, they have network access to the Internet through the host.
It would be great to have LXC containers getting from local DHCP server so that anyone from the network can connect to the container.
1. First we will create a bridge interface and add our physical interface (in the example it’s enp1s0) to the bridge:
sudo vi /etc/netplan/00-installer-config.yaml
network:
  version: 2
  renderer: networkd

  ethernets:
    enp1s0:
      dhcp4: false
      dhcp6: false

  bridges:
    bridge0:
      interfaces: [enp1s0]
      addresses: [192.168.99.252/24]
      gateway4: 192.168.99.1
      nameservers:
        addresses:
          - 1.1.1.1
          - 8.8.8.8
      parameters:
        stp: true
        forward-delay: 4
      dhcp4: no
Next apply the config
sudo netplan apply
2. Now install LXD
sudo apt install lxd
3. By default LXD will create a profile with name “default”. For us we will create a new profile name “bridgeprofile” and add the basic config:
sudo lxc profile create bridgeprofile
Profile bridgeprofile created

sudo cat <<EOF | lxc profile edit bridgeprofile
> description: Bridged networking LXD profile
> devices:
>   eth0:
>     name: eth0
>     nictype: bridged
>     parent: bridge0
>     type: nic
> EOF
Verify the profile:
# lxc profile list
+---------------+---------+
|     NAME      | USED BY |
+---------------+---------+
| bridgeprofile | 0       |
+---------------+---------+
| default       | 0       |
+---------------+---------+
4. Now generate lxd config using command “sudo lxd init” and select the appropriate options
root@lxd-home:/home/fakrul# lxd init
Would you like to use LXD clustering? (yes/no) [default=no]:
Do you want to configure a new storage pool? (yes/no) [default=yes]:
Name of the new storage pool [default=default]:
Name of the storage backend to use (btrfs, dir, lvm, zfs, ceph) [default=zfs]:
Create a new ZFS pool? (yes/no) [default=yes]:
Would you like to use an existing block device? (yes/no) [default=no]:
Size in GB of the new loop device (1GB minimum) [default=46GB]:
Would you like to connect to a MAAS server? (yes/no) [default=no]:
Would you like to create a new local network bridge? (yes/no) [default=yes]: no
Would you like to configure LXD to use an existing bridge or host interface? (yes/no) [default=no]:
Would you like LXD to be available over the network? (yes/no) [default=no]:
Would you like stale cached images to be updated automatically? (yes/no) [default=yes]
Would you like a YAML "lxd init" preseed to be printed? (yes/no) [default=no]:
5. Edit the profile and add the storage pool. You can add any other cloud-init config if you want. For example I have added my ssh-public key and related information
sudo lxc profile show bridgeprofile
config:
  user.user-data: |
    #cloud-config
    users:
      - name: fakrul
        ssh_authorized_keys:
          - ssh-rsa AAAAB3NzaC1yc2EAAAADAQABAAABAQDEgjB+5olN+5DuCkYJfZC6e/lMlW30inWEKkL0ThIVzgDh4hbjgvjaZGapYeS94PAE17Lk8FQnWb1bFQmBXP9jjbnExD9473AueJvN6Lhrc5GVnpIQ+K+9fxJfaS0k4CQbqDfMfL5+
VRYG/M8mm98rGz4ZleG7I/lKlgsoeXI8UZTl+gg6HO5vCmRglncKUIMmOuy06Z6DuO8dCh+pUnwBZW8bGcisZFDr6g3G7ZpVTDygOZQ08qV47VGutDkr3cBS8llQ8EzU9CBT+HRlSlbnfICWfY6nem4mwm+Ef2bvLlO3VVSoLgk+VvDLEi8oGMxQ38nF
xGnW6K/cJsomo3hd fakrul@au-mohammad.local
        sudo: ALL=(ALL) NOPASSWD:ALL
        groups: sudo
        shell: /bin/bash
        passwd: $1$hUDF3Apy$jJztHAqAE8qxMX3yl0rnK/
        gecos: Fakrul Alam
    # Update timezone
    locale: en_US.UTF-8
    timezone: Australia/Sydney
    # Update apt database on first boot (run 'apt-get update').
    package_update: true
    # Install required packages
    packages:
      - whois
      - inetutils-traceroute
      - traceroute
      - net-tools
description: Bridged networking LXD profile
devices:
  eth0:
    name: eth0
    nictype: bridged
    parent: bridge0
    type: nic
  root:
    path: /
    pool: default
    type: disk
name: bridgeprofile
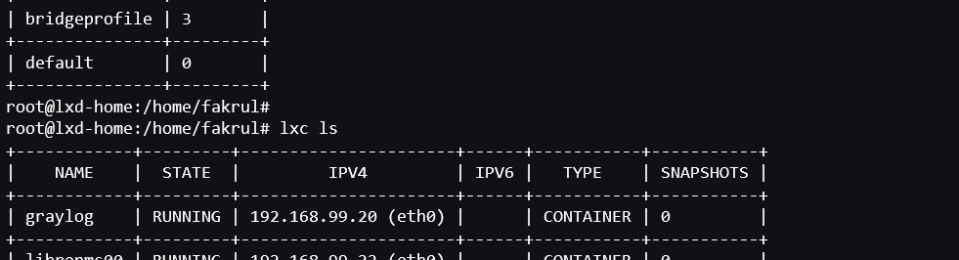
6. Now you can deploy instances with “bridgeprofile”
lxc launch -p bridgeprofile ubuntu:18.04 graylog
7. The instance “graylog” will get IP address from the LAN DHCP server.
